Flash ZHAC
ZHAC is a Zigbee hub that runs entirely on an ESP32: coordinator, device library, rules, Lua, MQTT and the web UI. Plug your board in over USB, press a button, done. This needs Chrome or Edge on a desktop computer.
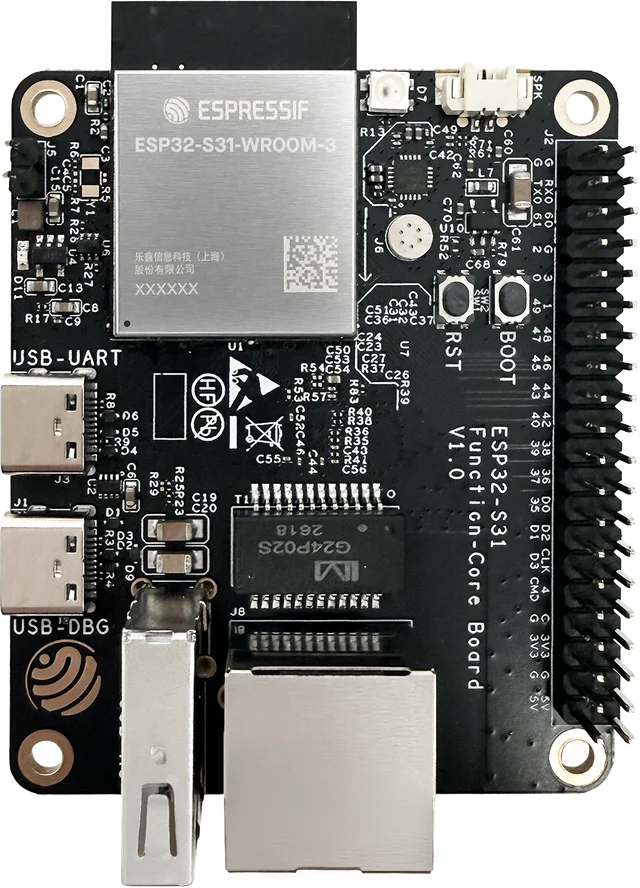
Espressif ESP32-S31 Function-CoreBoard
checking for a release…
One board, about $25, nothing to solder or wire: Ethernet, the Zigbee radio, a status LED and USB-C are all on it. It talks to your network over Ethernet only (the firmware does not use the chip's Wi-Fi). One flash and it is done.
- Connect the USB-C port labelled USB-UART on the board (the upper one in the photo, not USB-DBG) to this computer.
- Press Install, pick the serial port, wait about two minutes.
- Plug in Ethernet and open http://zhac.local. The first visit asks you to set a password.
Leave the erase box unticked and your devices, rules and settings stay: only the firmware regions are written. Updating later happens from the web UI (Settings → Update). The status LED blinks green while the join window is open and flashes blue on Zigbee traffic.
Guition JC-ESP32P4-M3-DEV (ESP32-P4 + C6)
checking for a release…
ESP32-P4 with 32 MB PSRAM and an on-module ESP32-C6 for the Zigbee radio, about $25 delivered. Also runs on other ESP32-P4 boards with an Ethernet jack. Two steps for a fresh board: install the Zigbee radio once, then install the hub itself.
Check the chip first. This build runs on ESP32-P4 silicon
v0.x–v1.x only. Run esptool --port <PORT> flash-id and look
for ESP32-P4 (revision v1.3). A v3.x chip will not boot it.
Use the board's CH340 USB-C port (labelled USB-TTL/UART, not the OTG ports) for both steps below.
1. Install the Zigbee radio (one time)
A fresh board's ESP32-C6 does not yet run the Zigbee firmware. This writes it over the link already wired inside the module, so there is nothing else to connect. It takes about a minute; once it has run, this board does not need it again — go straight to step 2 from now on.
2. Install the hub
Afterwards: plug in Ethernet and open http://zhac.local.
Advanced: flashing the C6 radio by wire (JP1), or updating it later
Step 1 above only works once — afterwards the C6 no longer runs the firmware it needs, so a later radio update, or recovering a board where step 1 does not work, means wiring the C6's own serial header directly instead of using the board's USB port:
- Hold the board's BOOT button, tap RESET, release BOOT. The P4 now waits in download mode and stops resetting the C6.
- Connect a 3.3 V USB-serial adapter to the C6 pins on the JP1
header: adapter TX →
C6_U0RXD(JP1-20), RX →C6_U0TXD(JP1-22), GND → GND (JP1-6). Leave 3.3 V/5 V unconnected — a 5 V adapter will damage the C6. - Hold
C6_IO9(JP1-24) to GND while you pulseC6_CHIP_PU(JP1-26, reset), then press the button below and pick the adapter's port.
Header labels are from the M3-DEV's own schematic; check yours before wiring. An ESP-Prog adapter (it drives the reset/boot pins itself) is more likely to work cleanly here than a plain USB-serial adapter.
Dual-chip hub — ESP32-S3 + ESP32-P4
checking for a release…
Two boards joined over SPI, with a CC2652P stick as the radio. Wiring is in the hardware guide. Flash each board separately.
ESP32-S3 (network, web UI, MQTT):
ESP32-P4 (Zigbee, rules, Lua) — silicon v0.x–v1.x only, as above:
Right after the S3 install, the installer asks for your Wi-Fi name and password and hands them to the hub over the USB cable, then links you to its web UI. This needs the board's UART port; on a board with two USB sockets, use the one marked UART. Reopen this page and press the S3 button again later to change Wi-Fi or find the hub.
If you skip that step, the S3 opens a Wi-Fi network called ZHAC-XXXX; its
password is printed on the S3's serial console at boot. Join it and pick your home
network.